Spooky Halloween Nail Inspo 2022
October 14, 2022With October 31st creeping upon us, here are some of our favorite Halloween nail looks sure to haunt your hands this spooky season. Keep reading to find out how to achieve these looks, and happy haunting!
Bloody French Mani
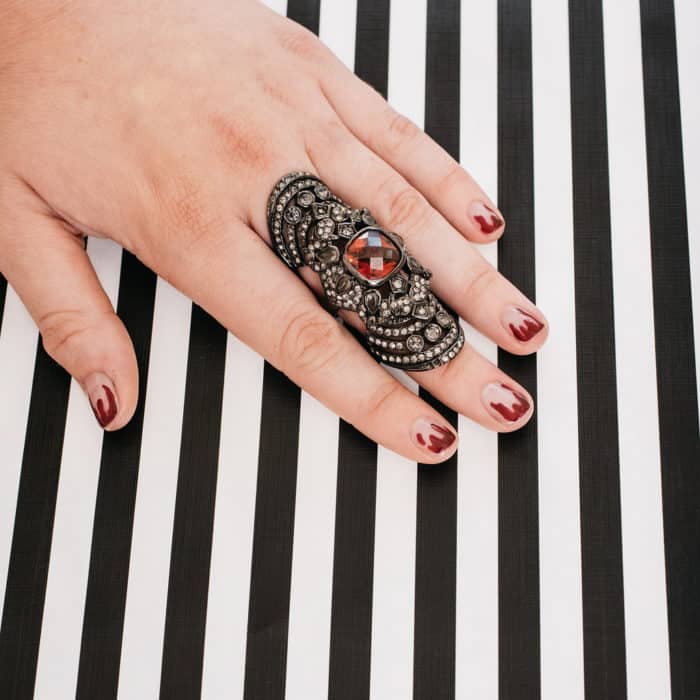
Think you can take a STAB at this look? This blood drip Halloween nail look is sure to be a trending nail favorite this spooky season, and we are here to give you all the deets on how to achieve it! Begin by taking your favorite opaque nude or off white polish and apply one coat evenly to each of your nails – we recommend going with a polish shade that best suits your skin tone. Once your nails are dry, have your favorite dark red polish on hand. We chose Essie Nailed It! Other bloody-beautiful dark red polishes we suggest are Essie Bordeaux, OPI Como Se Llama, and Dazzle Dry Fast Track Cherry. Using your nail dotting tool, begin to place red dots onto the nail bed. These dots are where you would like the blood drips to end. You can have a little fun with this and vary these dots from nail-to-nail, as we don’t want these drips to be uniform looking. From here, begin to drag up the excess color from the dot with a thin line brush. These lines do not have to be straight by any means, and are better if they are a little messier on the way up. Once you have the look dragging up, connect these blood drips from side to side along the top portion of your nail. After your drips have been formed to perfection, fill them in with your dark red polish to achieve the full effect! Finish off with a top coat, and you are guaranteed to have the best looking nails in any haunted house!
BeetleJuice Pinstriped Mani
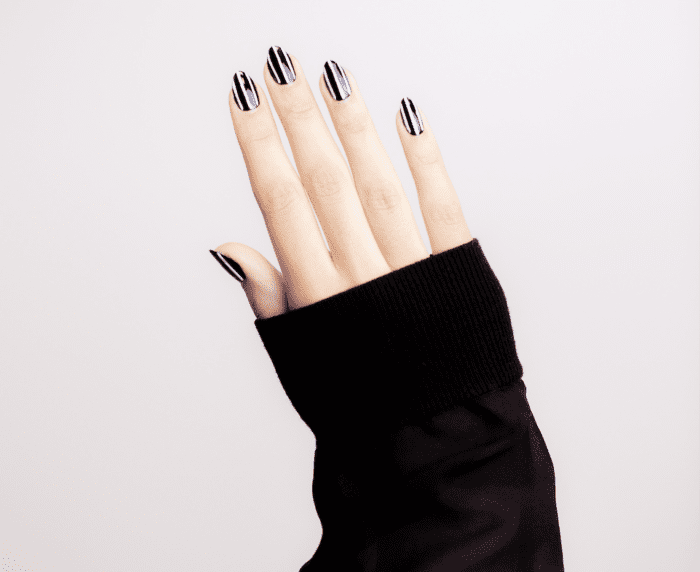
For our nail lovers who enjoy a more simple look, but are wanting to try something different this spooky season, we recommend this fun black and white stripe look! After you’ve completed your cuticle care, you can begin creating this look by shaping your nails into an almond shape. Apply two coats of your favorite black polish – we chose OPI’s Black Onyx. A few other black nail polishes we love are OPI We’re In The Black, Essie Licorice, and Dazzle Dry’s Midnight Express. Please ensure you allow some dry time in between coats to ensure an even polish application! Once these have dried, take a thin brush and apply a straight white line in the middle of your nail by dragging the brush from bottom to top, repeating this step on the left and right side of your nail bed. We recommend using an opaque white polish to draw these lines such as: OPI Alpine Snow, OPI Funny Bunny, Essie Pearly White or Dazzle Dry Fine China. Complete the same steps on the rest of your nails, and add a second coat of white polish to make that pinstripe effect pop. Finish off with a top coat for the perfect glossy effect!
Spellbinding Black Mani
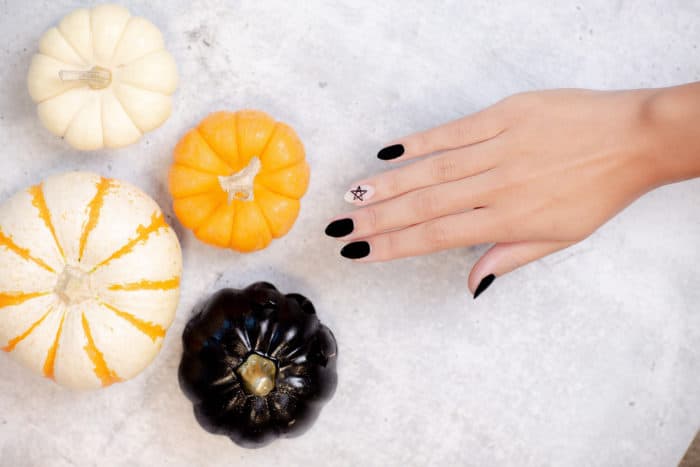
Looking for a bewitching nail look that will be sure to get all the ghosts and ghouls talking? This little black number is sure to do the trick! After completing your cuticle care, shape your nails into the universally flattering almond shape. Begin by applying two coats of your favorite black polish to each of your nails aside from your ring finger – we used Dazzle Dry Midnight Express. Next take the nude polish that fits your skin tone best, and apply two coats to your ring finger. A couple of nude polishes we love that flatter a wide range of skin tones are, OPI Tiramisu for Two, Dazzle Dry Textbook, and Essie Lighten the Mood. Once these coats have dried, take a thin brush with black polish and draw an upside down triangle, leaving the bottom of the triangle open ended. Repeat this step by drawing a sideways triangle in the middle of the nail bed, and finish by connecting the triangles together to complete the star. For maximum shine finish off the look with a top coat!
Black Magic French Tip Mani
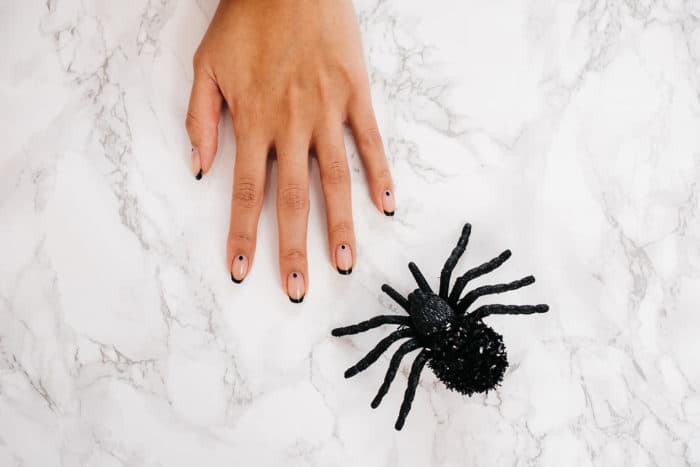
For those who love a classic look, here is a simple french manicure that is absolutely to DIE for! Begin with the first step to any good manicure, and tend to your cuticles by pushing them back gently, followed by trimming off any excess skin. This look can fit well with any nail shape but for this look specifically, file your nails into a square shape with a slightly rounded edge. Next, you will want to find your favorite opaque nude polish. Remember, the best nude polish for you depends on you, and your skin tone but here is a list of a few of our Bellacures favorites: OPI Bare My Soul, OPI Bubble Bath, or Dazzle Dry Pawn. Next take any black polish and lightly draw a thin line at the very top of your nail. For polishes, as mentioned previously we recommend: OPI’s Black Onyx, OPI My Gondola or Yours?, Essie Licorice or Dazzle Dry Bold. Slightly bring this line down further on the nail bed in a curved motion to give you the perfect thin black french mani! After the shape of the french tip is created make sure to carefully paint on an additional coat if needed to fill in any gaps. After this step take your black polish on a nail dotting tool, and place one dot carefully in the middle of your nail. SLAY this Halloween nail look by finishing with a top coat for optimal shine!
Burgundy Potions Mani
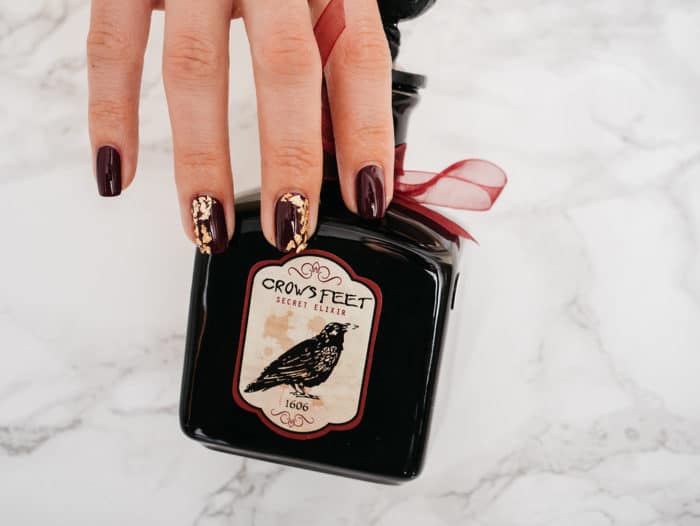
Any good witch knows you need the right ingredients to create the perfect magic potion. At Bellacures we believe the same sentiment can be said about the perfect Halloween nail look! To achieve this KILLER mani, begin with cuticle care on the nail bed and file your nails into a squared shape. Next apply two coats of a dark berry or burgundy gel polish and cure under a UV lamp. We used OPI’s Complimentary Wine Gel Polish to complete this look! A few other polishes we love for this look are: OPI In The Cable Car-Pool Gel Color, OPI Vampsterdam Gel Color, or OPI Yes My Condor Can-do! Cure each coat in between. Next, take your gold leaf nail flakes and apply them gently onto the outer corner lining of your nail beds. You can have some artistic freedom in this area, and apply as much or as little as you want to your middle and ring finger. Once these are to your liking gently tap them into the nail, and complete this magical look with a glossy gel top coat and cure!
Chained Up Mani
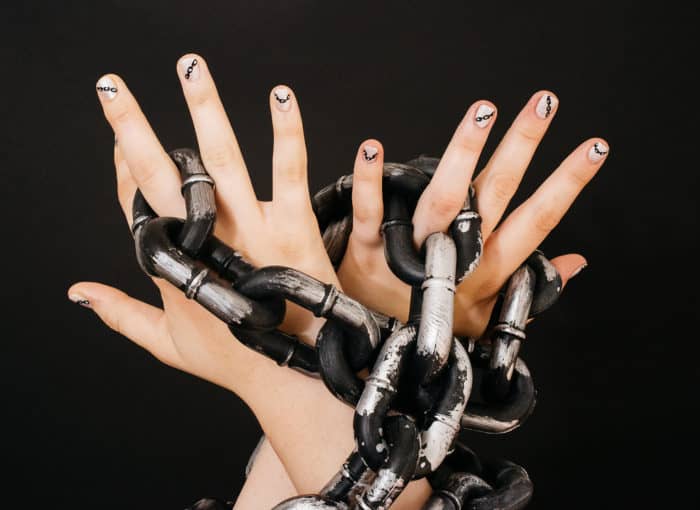
As eerie as it sounds we think this nail design is absolutely something worth being chained to this Halloween season! For this look begin by pushing your cuticles back, and trimming off any excess skin. While cuticle care is always a must, you’ll want to ensure you do not skip this step in order to be able to utilize as much of the nail bed as possible. Next file your nails into a square shape, or if you are wanting to add a little extra spice – try this look with Gel-X Extensions, or Acrylics. Once you’ve finished shaping your nails, begin by taking your favorite nude glitter polish, and apply two coats. For this look we used, OPI’s My Vampire is Buff. Next take a thin nail art brush and use your favorite black polish to begin drawing consecutive oval shapes in straight or curved placements on each nail, leaving a small space in between each oval. Try your best to make the chain placement different on each nail to give you that dimensional effect. Once you’ve finished the ovals, draw a small line in between each to connect them, giving you that overall chain effect. Finish with a glossy top coat to lock this Halloween nail design down!
Want to achieve these nail looks? Book an appointment at one of our 8 Bellacures locations to be Halloween ready come October 31st at bellacures.com!